Lasers cut many things. Choose wisely.
They're a maker's jigsaw, cutting complex shapes out of a wide variety of materials and engraving cool designs on even more. Wood, plastic, paper, leather, fabric, glass, stone... the list goes on.
There's a catch though. Just because you can cut it doesn't mean you should cut it. Many things that can be cut on a laser can be harmful - to you, the laser, or both! Making it even more confusing is that sometimes Brand A of a material (particularly EVA foam) may be perfectly safe, but Brand B or even a different color of Brand A might not be.
The best thing to do is get to know your materials a little better, so you can plan accordingly.
Material groups != specific materials
Any group of materials is just that - a group. 1/2" of "wood" covers a lot of different things - MDF, Plywood, OSB, Solid wood (and species of solid wood), Veneered plywood and more. Similarly "Leather" (fake leather, vegetable tanned leather, chrome-tanned...), "Plastic" (Acrylic, Polycarbonate, PET, PETG, ABS, Polystyrene...), "Paper", "Fabric"... you get the idea.
The takeaway here is if you haven't cut a specific material before don't assume it will behave the same as other things that fall under the same category. Some common variables can include:
- Density, sap and oil content of hardwood (Balsa, Birch, Maple, Oak, Cocobolo..)
- Glues in different types of plywood
- Dyes of different colors in foam or fabric
- Finishes applied to material (paints, sealants, etc)
- Mis-labelling of material (Clear plastic = Cast Acrylic? Extruded Acrylic? Polycarbonate? ...)
All of these affect both the cutting and engraving characteristics of the material as well as the safety.
Basic safety checks
With a laser you're burning things with a high intensity beam of light and producing gas and particulate byproducts. This inherently has risks, such as setting the material on fire, laser light harming your eyes without proper protection, and so on. So there are some really basic safety things:
- Vent early, vent often. Gas and particulate byproducts from burning have to go somewhere. Your lungs are not a good destination, so ideally vent externally or vent with a filtration system. Or both. Both is good.
- Eyes are useful. Please keep them safe. If your laser does not have an enclosure that protects you from the laser light, invest in appropriate laser safety glasses/goggles/monacles/gasmasks.
- Know your (laser's) limits. Check the manufacturer's specs to see what they think it's capable of cutting. Trust but verify - experiment to see what works and what does not.
- Fire safety. Be prepared (extinguisher, etc) for and keep watch for fires in the laser. Don't assume that just because it didn't catch on fire last time it won't catch on fire this time. Carelessness = laser fire = bad day.
- Research your materials.
The last one can be tricky, but it's worth the time to do a little research and know for certain what you're cutting and understand any particular dangers it may pose. If you're really unsure about a material, don't cut it.
Chlorine. Good for pools, bad for lasers.
One of the easier troublemaker materials to check for is Chlorine. Not only is it bad for people, but it degrades your laser parts (especially optics) as well. And it likes to hide. So how do you check for it? We like to go with the 3-step process:
- Does it have "Chlorine" or "Chloride" in the name? (Hint: the "C" in PVC)
- Google it.
- Flame test.
If it passes the first two, it's time to...
Fetch the torches!
"Flame test" sounds all scary and intimidating, unless you're a pyromaniac and then it's like someone rang a dinner bell, but it really only takes a few things:
- A small sample of the material
- A copper wire "testing stick" (more details below)
- A propane or butane torch + some way to light it
- A safe place to fire up the torch and a safe place to set down a hot copper wire
- About 2 minutes
NOTE: Because this is the internet, and basic instructions can't keep you safe, remember this involves FIRE. If you are not careful you *will* burn yourself, burn other things, etc. So just because we describe how to do it here doesn't mean you should rush off and do it. Use common sense, do at your own risk, stay safe.

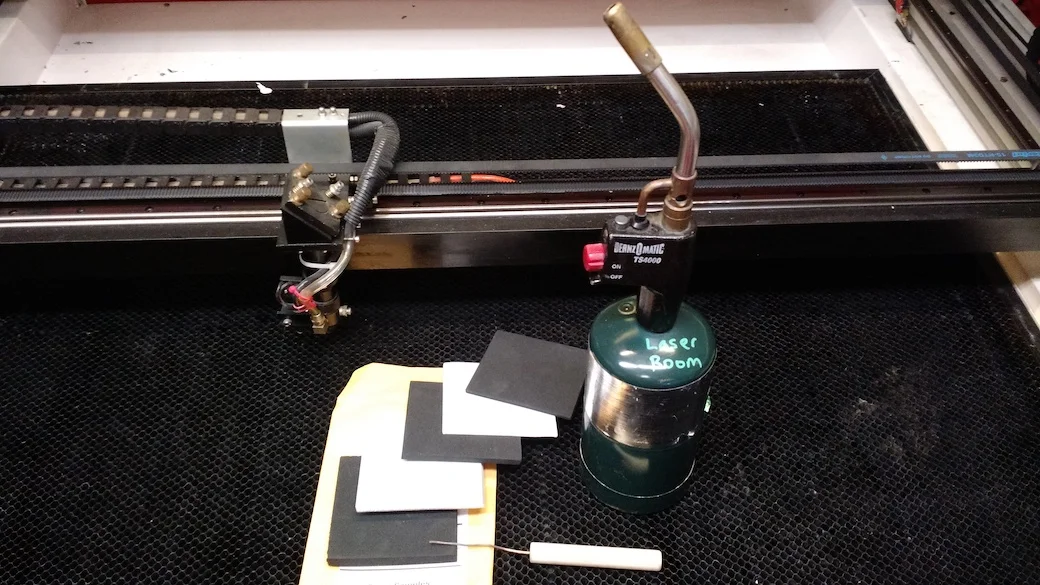
Foam samples, a testing stick, and our propane torch (with igniter trigger) on our 4x3' laser. Yes, the honeycomb bed is due for replacement soon..
A "testing stick" is simply a piece of solid copper wire (12ga or lower, so at least the thickness of spaghetti but ideally thicker) in a heat-resistant handle. We use a wooden rod, but you could use locking pliers or whatever you have handy.
The procedure is straight-forward:
- Have the material you want to test in an easy to reach location.
- In your SAFE location, fire up the torch and heat the end of the copper wire until it's hot enough to melt the material you're testing (poke it into the material every so often to check, but typically >20 seconds should be enough)
- Melt a small bit of material onto the end of the wire. By small we mean "drop of hot glue" small, not even "lump of toothpaste" small.
- With the torch running, stick the end of the wire back into the flame, and check to see if you see Green color in the flame.
If you see Green in the flame, there's Chlorine. If you're unsure if you saw it, repeat the test, getting a slightly larger chunk on there. For the technical-minded, this test indicates the presence of Halogens (bromide, chloride, iodide... not flouride though, from what we've been told) and is also called a "Beilstein Test". New fact for the day.
A recent test - EVA foam
Recently we've had more members wondering about the safety of EVA foam. Awesome for cosplay and props, cheap, easy to work with... and there's no "C" in "EVA", and Google says it's Ethylene Vinyl Acetate so sounds good, right?
We decided to test things out. We picked up some random EVA sheets at some local craft stores, and contacted the good folks at TNT Cosplay Supply (tntcosplaysupply.com) to get their free sample pack as well. The results?
Result: Not all EVA foams are safe. Some have Chlorine.
In general, common EVA foam should be safe to cut. However, there are variances. Some of the foams we got from stores behaved differently, even with the same color and same brand. Far more common with the dollar store variety foam, but we're suspicious that some of the brand name foams at craft stores are also from different producers occasionally... more testing to come.
All of the foams in the free sample pack we got from TNT Cosplay Supply were black and white and had no issues. The thicker black we got from them also cut more cleanly, on average, than the craft store foams as well.
We found that Black, White and Tan foams from three major craft chains (Michaels, AC Moore, Hobby Lobby) were typically fine, but colors (especially Green) were more problematic. Specifically out of the colored foam we tried Green and Purple had issues, but Blue and Orange did not. We did not try anything sparkly or adhesive backed, so not even going to guess there...
The sheets we got from various "dollar stores" were too unreliable for lasering. Even two pieces labelled identically had visible differences in characteristics in one case. So while it's likely fine for general crafting we don't recommend it for lasering; even if it burns safely you could get different quality cuts from one sheet to the next.
Now it's important to note that our tests are just our own results at a specific point in time. Things can and do change, so feel free to use our results as one piece of information but please make sure to test for yourself if you're uncertain.
A side note - Foam is Melty Melty.
Just for your awareness, laser are accurate things, but when you cut things like foam with a laser you have to account for more than laser "kerf" (width of the beam), you have to account for deformation and contraction of the material from heat. Aka "shrinkage". For many applications you may not care if your exterior dimensions are less than 1mm off , but for others, such as close fitting parts, you should definitely test how cutting impacts your materials - and experiment with changing cutting power and speed until you find the best match.
As an example, we cut a specific size circle out of a lot of our foams, and on an 80w laser, without really fine-tuning it, sometimes the Outer Diameter (OD) of the cut piece and the Inner Diameter (ID) of the resulting hole in the original material were off by a bit (up to 2mm in some cases)t:

Samples with Power/Speed values used on our 80W Rabbit CO2 laser, and deviation in ID and OD in the various samples.
Just to wrap up..
Our primary rule of using the laser at MakeIt Labs is: Be Safe. If you don't know whether something is safe to cut, ask. If you're dealing with a new material, ask and test. If you're still not sure, don't do it.
There are plenty of materials out there that cut well, and plenty more that can cause problems. Chlorine Flame Testing is one test that doesn't take a long time, or any special equipment, and it can save you lots of wear and tear on your lungs and your laser.
Remember that this test alone doesn't ensure that something is safe - certain items like PTfE/Teflon cut really well on the laser but have hazardous byproducts. Other items, like Polycarbonate, look like acrylic but cut poorly and produce lots of byproducts that can gum up your laser. But testing for Chlorine is a step, and the more steps we all take towards safety the better.
Happy lasering!